 Borland's
dBASE (originally developed by Ashton Tate) is probably the most
widely used database management program available. With the release of
version 5.0, dBASE has finally made it's way into the Windows environment.
Users of dBASE III+ and dBASE IV will appreciate dBASE for Windows' compatibility with applications developed using those versions. Many of the features available in dBASE for Windows are solely for the purpose of managing files and applications developed with those older versions. System Requirements:Running dBASE for Windows requires a minimum 386 processor, VGA or SVGA monitor with the appropriate graphics adaptor and a mouse. The documentation states that a minimum of 6Mb RAM is required and 8Mb recommended; personally, I would not advise running ANY Windows application with less than 12Mb RAM.Also required are DOS 3.1 or later or a compatible operating system and Windows 3.1 running in enhanced mode. dBASE for Windows supports the following multi-user environments: Netware 3.11, 3.12, 4.01; Personal Netware (Novell DOS 7); Banyon Vines 5.5; IBM LAN Server 3.0; MS LAN Manager 2.2 and Lantastic 6.0. Use of the IBM LAN Server requires special configurations that are outlined in the README.TXT file included on the master disk. Full installation of all components requires 24Mb of hard disk space, minimum installation requires 10Mb. In addition, you will need 1.5Mb of free work space on your Windows drive. You will need to allow a 20% margin of free disk space if working from a compressed disk. Price:Borland's suggested retail price for dBASE for Windows is $400. A quick check of local software retailers revealed a price range of $330 to $390. The mail order price range is $325 to $340.Licensing Agreement:As with all copyrighted material, there are restrictions on how dBASE for Windows may be used. With the exception of being able to make an archival backup, dBASE for Windows may be used just like a book. This means that you are free to move it from one computer or location to another as long as there is no possibility that it will be used by more than one person at a time, just as a book can be read by only one person at a time.Multi-user packs are available at a cost of $375 per individual or $3,710 for a 10-user package. A quick comparison with the figures listed above will show that it would be less expensive to buy each user their own individual copy of the software. Distribution of your own applications is permitted in executable form only, source code may not be distributed. Borland is in the process of developing a Windows Distribution Kit that will allow distribution of certain DLL's along with your applications; for an additional $295. Documentation:dBASE for Windows is well documented. It is my opinion that many software packages (including some of Borland's) suffer from serious documentation overkill; this is not true of dBASE for Windows. The seven volumes of printed documentation are well organized and easy to use. They are structured in such a way as to not be intimidating to the inexperienced database user or even the Windows beginner, or boring to the professional database expert. Online documentation includes Windows-style context sensitive help files and a series of interactive tutorials that are quick and easy to follow and will allow you to develop actual dBASE tables and applications with real data while you learn.Installation:Complete installation takes 24 minutes and requires 24Mb of disk space. As mentioned previously, minimum installation uses 10Mb. The third option that is available is a custom installation allowing you to choose which non-essential components (Help and sample files) are installed. These options permit you to fit the installation to your specific needs according to how you plan to use the programs and how much disk space is available.Installation of many Windows applications makes changes to configuration files scattered all over your system and very few include an uninstall utility. Trying to remove an application from your system can be a major pain when it comes to tracking down all the references. dBASE for Windows does not have an uninstall either, but it does the next best thing. The installation procedure creates a file called INSTALL.TXT in the main dBASE for Windows directory (C:\DBASEWIN by default). This text file contains a listing of all changes that were made to the configuration files during the installation procedure. After all the files are installed on the disk, the dBASE for Windows installation procedure does something that in my experience is totally unique, it actually asks if you want the Group Icon installed to your Program Manager. The novice should probably select this installation, however, the experienced Windows user will appreciate the flexibility of being able to control where and how the program icons are installed. The final step in the installation procedure is the configuration of the IDAPI. The Integrated Database Application Programming Interface is Borland's Database Engine that allows dBASE for Windows to share data with other programs including Paradox for Windows, Quattro Pro for Windows and various SQL databases. The configuration procedure is as simple as selecting the appropriate file types and device drivers from a dialog box.
User Interface
Navigator: (figure 1) The Navigator is the graphical equivalent of the Control Center in dBASE IV. The control box in the upper portion of the window is used for changing the current directory. The desired directory can be typed directly into the box or selected by clicking the button to the right of the control box. In the lower portion of the window, the left box lists all of the types of files available; tables, queries, forms, reports, etc. Selecting an icon from this window will produce a list of all files of that type in the right box. Opening a file is as simple as double clicking the appropriate icon in the right box.
Sessions: Sessions is a concept of dBASE for Windows that offers two models for working with your tables. With sessions enabled (the default), dBASE follows the Windows model, for example, closing a table window also automatically closes the table if the table is not referred to by another window. The same table can be open in more than one session simultaneously, each has its own record pointer and can have a different master index, but changes made in one session will be reflected in any other session in which that same table is open, much like if the table were being shared across a network. The Command window exists in its own session separate from whatever you may be doing in the Navigator. You can see commands generated in the Command Window by Navigator actions, but commands entered in the Command Window will have no effect on tables opened in the Navigator and switching back and forth between the two can have unpredictable results. For example, if a table is opened in the Navigator and indexed through the menu, the table will be displayed in the indexed order as expected. However, if you then attempt to locate a record by typing the FIND command in the Command Window, you will get an error message that says the table is not indexed. With sessions disabled, you are essentially doing all work in a single session. In this mode, dBASE for Windows handles table editing in a manner similar to older versions of dBASE. Closing a table window does not automatically close the table and commands entered in the Command Window effect all open tables. You can still use the same table in more than one window, but they will all have the same record pointer and master index. TablesThe table is the basic building unit of the database, the file that actually contains the data. Tables are what previous dBASE versions called database files, with the release of dBASE for Windows, the terminology has been changed to be consistent with that used in the general database community.To create a new table you can click the Design Button in the speed bar, double click the 'Untitled' table icon in the Navigator (see figure 1), select File|New|Table from the main menu or enter the CREATE command in the Command Window. Each of these actions put you in the Table Design mode which looks very similar to the corresponding screen in dBASE IV (figure 3).
The Type control at the top of the window allows you to select to create a table for dBASE, Paradox or SQL, depending on how the IDAPI was configured during the installation. Data Types: dBASE for Windows supports all data types of previous versions; the character, numeric, date, logical and memo types from dBASE III+ and the floating type of dBASE IV. In addition, dBASE for Windows supports the binary data type that can be used to hold graphics or sound files and the OLE type that will hold a link to applications from other OLE compatible programs. In past versions, memo fields were contained in a file that had the same base filename as the dBASE table with the extension .DBT, the field in the record held a 10- byte pointer to the offset into the file of the portion associated with that record. In dBASE for Windows, a single DBT file is used to store all of the memo, binary and OLE fields in the table. Indexes: dBASE for Windows supports the individual file .NDX indexes of dBASE III+ and the multiple .MDX index file of dBASE IV that contain all indexes in one file. Now however, an .MDX index key can be based on multiple fields, expressions, functions or combinations of these features. The limitation is that the expression used can be a maximum of 220 characters long and evaluate to an expression that is a maximum of 100 characters. Indexes are created by clicking the index box in the Table Design Window or by selecting Table|Table Utilities|Manage Indexes from the main table menu. An Expression Builder tool is available (as with all operations that involve writing an expression) that allows expressions to be written by selecting fields, expressions, functions and operators from list boxes; you can even include fields from other tables as part of the index key. This feature is available through the Table Utilities menu. The Index box in the Table Design Window allows only the selection of ascending or descending order. A major advantage of using expressions or functions in an index key is to be able to use the UPPER() function to create a 'dictionary order' that will index records based on the spelling of a character field that is case insensitive (the UPPER() function converts all characters to upper case). This can be important if you want your table indexed on names in an area like San Antonio that has a large ethnic population where names frequently have mixed-case spellings. If you are using the American English language drivers (set up through the IDAPI configuration at installation) this situation can play havoc with trying to view records alphabetically since upper case comes before lower (Zebra before aardvark). Indexing does not effect the original table or the data in the fields, it adjusts the logical order in which the records are viewed. Sorting: Sorting a table results in a duplicate table being created with the records rearranged in the desired order. Any updates performed on the sorted table will have no effect on the original table (and vice verse). The Sort feature is accessed through the Table Utilities menu. Sort vs Index: Some considerations that should be taken into account when deciding if it would be better to sort or index the table are:
In general, sorting is better used with tables that are relatively static and are not frequently updated or when it is to be exported to another application. Tables that are used for data entry, updating, queries, forms or reports are more efficient when indexed.
Entering and Editing Data: Quick, easy and direct access to a table is provided through the Table Records Window. dBASE for Windows offers a choice of three different views of the table according to the settings selected in the Files page of the Desktop Properties dialog.
Switching between views is as simple as clicking a button on the button bar (inset). Setting properties: Selecting Properties|Table Records Window from the menu opens a dialog that allows you to set the properties of the fields, records or window. By selecting the Fields tab, you can choose which fields will be displayed or hidden, add calculated fields or set individual properties of each field. The options available are:
Setting properties in the Record page lets you determine if editing will be allowed including adding and deleting records and selecting which records will be displayed. Moving to another record: The Table menu includes entries that allow movement forward or back one record, one page (screen), to the first or last record, to a specific record number or to locate a record based on the contents of a field. With the exception of location by record number, all of these feature are also available on the button bar. One great feature that has been added to dBASE for Windows is the use of Soundex codes for use in record searches. Soundex is a system of coding names that was developed for use in genealogical research that will find names with similar spellings, For example, when the Soundex feature is turned on (select Sounds Like in the Find dialog box), a search for 'Smith' will also locate 'Smythe', 'Schmidt' and any other similar names. Records can be viewed, entered, edited or added in any of the table views. Records can be deleted by checking the Delete check box in the browse mode or by selecting Delete Records from the Table Utilities menu. As with earlier versions of dBASE, deletion is a two step process. The step outlined above marks the record for deletion, actual removal of the record from the file is accomplished when the file is 'packed' by selecting Pack Records from the Table Utilities menu. If you need to delete a record and add a new record at the same time, select Blank Selected Record from the Table menu. This feature will clear the data from all fields in the record without deleting the record leaving a blank record to enter the new data. The availability of Windows features are also handy when it comes to editing data. One of the tasks I recently had to perform was to restructure the APCO Membership table. The original structure contained the fields FIRST_NAME and LAST_NAME (see my article 'Code Generation -- from xBase' in the Oct 94 PC Alamode for a discussion of the table structure). The middle name/initial was included in the FIRST_NAME field as well as any title placed at the beginning of the name and ending titles were included in the LAST_NAME field. In other words, if the member's name was Dr Jim A Smith Jr, FIRST_NAME contained 'Dr Jim A' and LAST_NAME was 'Smith Jr'. This presents two problems: First, it does not permit using a field as a salutation field for mail merge, you do not want to send a letter that starts with 'Dear Dr Jim A'. Secondly, it does not permit the table to be correctly alphabetized as 'Dr Jim A Smith Jr' would come after 'William Smith' because of the additional characters in LAST_NAME. To change the structure of an existing table, simply open the table and click the design button. The Design mode button bar includes buttons to add, insert or delete fields. Add puts the field at the end of the record, insert puts it before the field that is selected. If you don't like where a field is located, simply Drag-and-Drop it to the desired position. Moving data from one field to another is fairly easy using one or two global commands. However, in this case, what was needed was to split two fields into as many as five different fields. Because there are no general rules as to how a person's name is structured, the data had to be moved manually. This would have taken several days using the previous version of dBASE, however, using the Windows Clipboard, it was a simple matter of Cut-and-Paste; I was able to process about 1000 records an hour, the entire process took about half a day. Working with the Binary data type: Binary fields are usually used to store bitmap images (in .BMP or .PCX format) or sound files (.WAV format). To enter data in a binary field, simply double click the field to open the Empty Binary Field dialog. Select the type of file (image or sound) that you want to insert and an empty Image Viewer or Sound Player window will open. Then select File|Insert From File from the main menu and select the file that you want inserted and close the window. The file is copied into the table's associated .DBT file and the field contains a 10-byte pointer that tells dBASE for Windows where it is located in the file. To view the image or play the sound, simply double click the field. If the field contains an image, it will be displayed in the Image Viewer window; a sound file will open the Sound Player dialog, then press the 'Play' button. [Aside: The limited number of file formats that can be used is a severe restriction. However, this problem can be bypassed by any utility that can convert the file format. Two that come to mind are Graphics Workshop for Windows and one called PSEVAL.EXE. Both these programs are available on the APCO BBS. Graphics Workshop will convert any bitmap format to either BMP or PCX. I have tested this procedure and it works with GIF, TIF and TGA formats, it may or may not work with WPG because WPG may or may not be bitmap. One potential drawback to Graphics Workshop (at least in the shareware version) is that images are dithered to 8 colors. My personal preference is PSEVAL, a Windows based screen capture utility, because it will work with every format including non-bitmap formats. Using this program, you simply load it as a TSR, then run the program that uses the format you want to work with. When the desired image is displayed on the screen, hit PrtScrn for the entire screen or Alt-PrtScrn for the active window and the window is copied into the Clipboard. It can then be pasted into Paintbrush, edited (as needed) and saved in the BMP format. I have tested and verified this procedure with CGM, GIF, MAC, PIC, PCS, PCX, TIF, TGA, WMF and WPG formats. The graphics used in this article were created this way. A potential drawback to either of these methods is the availability of disk space as it requires three copies of the file; the original format, the BMP or PCX copy and a copy in the DBT file. Working with OLE: Object Linking and Embedding is a method of attaching data from other applications into a field. The other application is known as the 'Server' and dBASE for Windows is the 'Client'. An OLE field can contain an image file, sound, spreadsheet, word processor document or any thing else created by any application that supports OLE. dBASE for Windows stores the OLE information in the .DBT file. To embed an object, select the field by double clicking it, then select Edit|Insert Object from the main menu and select the type of object you want from the dialog box. This will start the Server application and you can then load or create the data you need, then return to dBASE for Windows and select File|Update from the menu. A copy of the object is inserted into the field. Because it is a copy, it will be retained in its current state regardless of changes that are later made to the original object. On the other hand, linking stores a reference to the original object so that it will always contain the most recent updates. To link an object start the Server application and copy the desired object to the Clipboard. Switch to dBASE for Windows, double click the OLE field then choose Edit|Paste Link from the menu. In addition to being able to keep up with changes in the object, linking uses less disk space because the object is not duplicated. Once the object is linked or embedded, it can be viewed by double clicking the field. This will launch a session of the Server application. For example, if the object is an Excel spreadsheet, selecting the field will start Excel with the object spreadsheet open and ready for editing. If it is embedded in the dBASE for Windows table, it will have to be re-embedded after editing if it is important to reflect the latest changes in the table. dBASE for Windows can also serve as an OLE Server to pass data to other applications. The procedure for doing so would be determined by the Client server that is receiving the data. For a list of applications on your system that are OLE compatible, run the program REGEDIT.EXE /V from the Windows Program Manager. It is located in the Windows directory and is maintained by the installation procedure of applications that support OLE. Importing and Exporting: Data can be imported or exported for sharing with other applications. Exporting copies data to a new table or a different file type, importing adds data to a table from another file type or spreadsheet. dBASE for Windows supports the following file types:
To export data, select the source table, then choose Table|Table Utilities|Export Records from the main menu. This will open the Export Records dialog (figure 5). The controls in the upper left allow you to specify the target filename and type of file that you want to export to and the delimiting characters. The upper right section sets the scope and conditions that will determine which records will be exported. The bottom part is for selecting the fields that will be included in the target file. Importing data from a spreadsheet is even easier. Select File|Import from the main menu. In the Import dialog, specify the filename. The Tool button can be used to select the filename and type (Quattro Pro or Lotus 123). Selecting the 'Headings' check box uses the first row of the spreadsheet as field names. To add records to an existing table, open the target table then select Table|Table Utilities|Append Records From File from the menu. The Append dialog is similar to the Export, offering the selection of the source filename and type, delimiting characters and a condition for filtering which records will be added. Implications: Some considerations that should be kept in mind when importing, exporting or appending data are:
ConclusionI have been using dBASE for five years and Windows for two. Now, finally, the two have come together. I have looked at other database management programs, they all have some good features, and some that I don't like, but I have always come back to dBASE. Probably the most important consideration, in my case, is as stated in one of Borland's ads "Because its dBASE, you already know how to use it." With all the software I have been trying to learn lately (3 word processors, 5 databases, 6 spreadsheets, 4 programming languages, ...) sometimes my learning curves feel like a bowl of spaghetti and there is always a certain comfort in familiarity.This discussion has looked at some of the features of dBASE for Windows and some general considerations for the use of tables. In part 2, I will discuss the use of Queries, Forms and Reports. Part 3 will consider programming and the adaptation of the xBase language to object oriented applications and the Windows environment. |
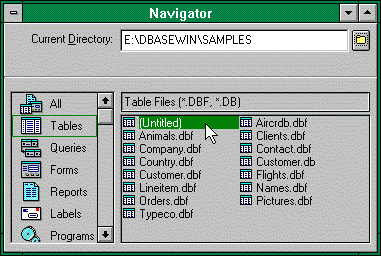
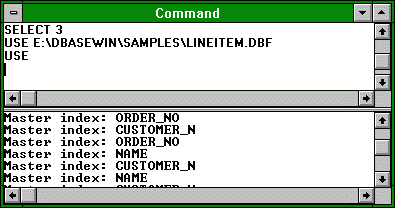
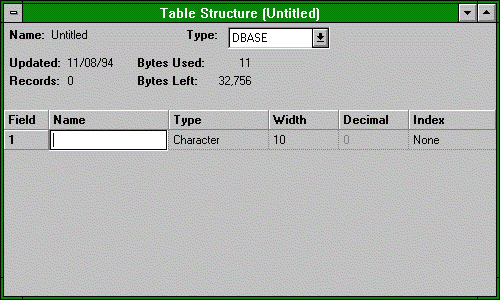 Figure3: Table Design Window
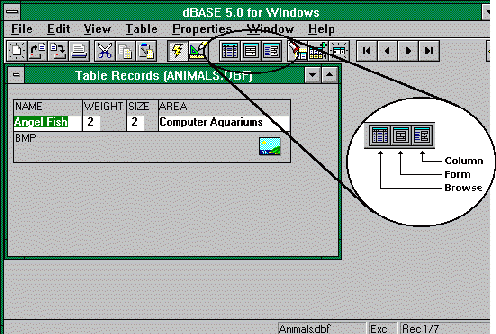 Figure 4: Table Records Window in form mode
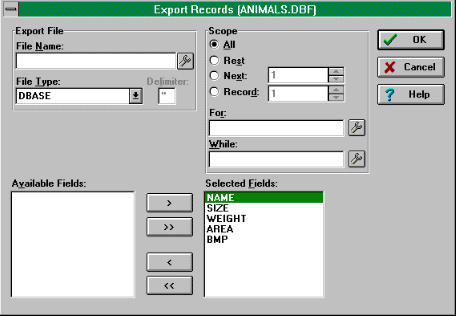 Figure 5: Export Dialog Box